
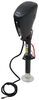
Blue Ox Base Plate Kit - Removable Arms


To see if this custom-fit item will work for you please tell us what vehicle you'll use it with.


Custom designed to fit your vehicle so it can be safely towed behind your RV, this base plate has easily removable arms that offer a seamless look when you're not flat towing. Base plate bolts directly to your chassis, so no welding is required.
Features:
Specs:
This base plate's hidden design creates a clean and seamless look. The bracket arms are easily removable, creating a slick appearance when you're not flat towing. Because the arms can be removed, you also won't have to worry about banging your leg into any protruding arms when you walk by.
Attaching and removing the bracket arms is a breeze. To attach the arms to the base plate, simply insert them into the receivers and rotate them until they lock into place. Once you're finished towing and want to remove the arms, pull the pin to disengage the lock, rotate the arms, and remove them from the receivers. Finally, plug up the now empty receivers with the included receiver covers to help keep dirt and debris out of the base plate and provide a finished look.
Flat towing your vehicle is much more convenient than using a trailer or a tow dolly. These other options take up much more storage space, leaving you less room both at home and at the campsite. In addition, securing your vehicle to a trailer or tow dolly can be a hassle and more time consuming than hooking up with a tow bar.
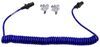
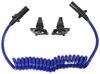
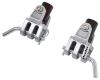
There are 5 basic components needed when flat towing a vehicle: a tow bar, a base plate kit, a safety cable set, tow bar wiring, and a supplemental braking system.
The tow bar links your towed car to your motorhome. It attaches to the custom-fit base plates that install on the frame of your towed car. Safety cables ensure that your towed car does not separate from your motorhome in the event that your tow bar becomes detached. Tow bar wiring allows your towed vehicle's signal lights to sync up with your motorhome's tail lights, which is required by law in most states. Finally, the supplemental braking system - also required in most states - brakes your towed car when the brakes in your motorhome are activated, preventing wear on the motorhome and decreasing braking distance for your entire setup.

California residents: click here
Videos are provided as a guide only. Refer to manufacturer installation instructions and specs for complete information.
Today is 2004 Chevy Cavalier. We're going to install part #BX1647 from Blue Ox. First thing to do is go ahead and move the top portion of the front trim. Fasteners is in the back side of this piece and we can just pull straight out. We're going to move this screw on the driver side and repeat the same thing on the passenger side. Next we're going to move, three fasteners, one, two, three inside the fender well.
This is the driver side, repeat the same thing on the passenger side. Now, the straight fasteners are underneath the vehicle and we're going to remove and the same thing under the passenger side. inaudible make a room, we're going to remove this fastener as well. There's going to be three fasteners that we have to remove that are right behind the headlight. Now, we're going to reach from the bottom up and we're looking at the passenger side.
Now, on the driver side there's some components on the way that are going to be harder to see. In this side, it might just be easy to get along the extension and crawl your way up in there. There's two fasteners in the bumper--okay, one right here that goes straight into the foam. Just point and go ahead and move the front bumper to face you. Now, we're going to remove this fastener right here so we can get the foam behind the bumper out of the way.
All right, now we're going to remove this line going to the pump, it's going to--you see the trim panel tool, it's not dripping so looks like it's empty. Lucky if it was full we could slip another line in that place and then we'll put a bolt in the other end just to hold it to plug it so it won't drip everywhere. Right, now to remove these components, we're going to remove three fasteners, one, two and three which is back here. Okay. Now, these components are also connected to the fender liner so we're going to remove these two screws here.
When I get the bottom loosened up, now, the very top is a push pin up here. The driver side is cleaned out now, now we'll go to the passenger side and we have got to do the same thing. However, we have just got to remove the horn with this bolt right here in its bracket and the wire, we're just going to move it out of the way. We also have to remove this push pin for the panel. At this point we can now start installing the base plate--now, you are definitely needing an extra set of hands to hold it up while I clamp it in place. With the base plate clamped up, we'll go ahead and mark and drill our four holes. Also, there's a hole that's underneath the bumper structure that we have to drill into as well. Okay. At this point, we can go ahead and start installing our hardware. We're going to use the handle nuts, we're going to push you from the opening in the bottom and run it behind the hole we're going to use, we're on a lock washer onto a bolt and a little bit of red lock tight to it. And we'll go ahead and turn it with our handle nut. We'll go into the next one, leave everything loose until all the hardwares are installed and then we'll go ahead and tighten them down and then torque them down as specified in the instruction. Well, you will have to cut excess length off the handle. All right, now we're going to have to reseal our components with the horn, let me check the electrical. Now, this part here was replaced by the bolt right here so it's just going to have to stay loose, our clip for a wire was covered by a towbar too so we'll actually just got to move it right up here. Now, we'll go ahead and start putting the components back onto the other side. All right, now we'll go ahead and continue resealing the interior components. We'll go ahead and put our foam in the place, we'll have to do some trimming and go make a notch on it, we'll just cut it in half like go over this way and it should fit right up. All right, lastly, we're going to install our safety cables. It will wrap around the frame in any fashion that you can do it in. We'll take two ends, bring them together and use them to quick link, connect them to our base plate. Now, the difficult part is re-install the bumper cover, it will make any adjustments to the bumper cover if we have to. Now, one last detail, now we have actually installed the bracket for the wiring connector. We use a self threading bolt to the end of the tube. We're going to adjust the height of these row to four pole or even a six pole. Now, next we'll go ahead and install the tabs for our towbar and we're finished. Now, this is for install of part # bx1647 from Blue Ox, our 2004 Chevrolet Cavalier.


Prompt service!
Great service
Fast shipping, good price, good product, easy install.
Delivered promptly!
Got package as told
Do you have a question about this Tow Bar Base Plate?
Info for this part was:
At etrailer we provide the best information available about the products we sell. We take the quality of our information seriously so that you can get the right part the first time. Let us know if anything is missing or if you have any questions.


Thank you! Your comment has been submitted successfully. You should be able to view your question/comment here within a few days.
Error submitting comment. Please try again momentarily.